WXTとAngularを組み合わせてブラウザ拡張を開発するためのスターターテンプレートを作成した。Chrome、Firefoxなど複数のブラウザ向けの拡張機能をAngularの最新機能を使って効率よく開発できる。
WXTとは
WXTはブラウザ拡張機能の開発を効率化するためのフレームワークだ。Viteをベースにしており、高速なHMR(Hot Module Replacement)による快適な開発体験と、ファイルベースでマニフェストを自動生成する仕組みを提供している。
特に便利なのは、Chrome、Firefox、Edge、Safariなど複数のブラウザに対応した拡張機能を単一のコードベースから生成できる点だ。Manifest V2とV3の両方をサポートしており、ブラウザごとの差異を吸収してくれる。
Angularでブラウザ拡張を作る
ブラウザ拡張のUI部分はHTMLを読み込むことになるが、WXTでは公式にいくつかのライブラリをサポートしている。wxt initコマンドを実行すると、VanillaやReact, Vueなどのテンプレートを選べるが、まだAngularのテンプレートはない。しかしやることはそれほど難しくないため、VanillaをベースにAngularを使う構成をセットアップすればよい。
ただし、AngularをViteで動かすには@analogjs/vite-plugin-angularというプラグインが必要になる。このプラグインはAnalogJSプロジェクトが提供しており、AngularをViteエコシステムで使えるようにしてくれる。
プロジェクト構成
このスターターテンプレートは次のような構成になっている:
├── entrypoints/
│   ├── popup/          # Angularのポップアップ画面
│   │   ├── index.html
│   │   ├── main.ts     # Angularのブートストラップ
│   │   ├── app.ts      # ルートコンポーネント
│   │   └── style.css   # Tailwind CSS
│   ├── background.ts   # バックグラウンドスクリプト
│   └── content.ts      # コンテンツスクリプト
├── wxt.config.ts       # WXTの設定
├── tsconfig.json       # 基本のTypeScript設定
└── [tsconfig.app](http://tsconfig.app/).json # Angular専用の設定WXTではentrypointsディレクトリ内のファイルから自動的にマニフェストが生成される。popupディレクトリがAngularアプリケーションの入り口で、background.tsやcontent.tsは通常のTypeScriptで書ける。
セットアップ手順
ゼロから作る場合の手順を説明する。
1. WXTプロジェクトの初期化
まずWXTプロジェクトを作成する:
pnpm dlx wxt@latest init my-extension
cd my-extension
2. 依存パッケージのインストール
Angular本体とビルドツールをインストールする:
# Angular本体
pnpm add @angular/core @angular/common @angular/compiler @angular/platform-browser rxjs

# ビルドツール
pnpm add -D @analogjs/vite-plugin-angular @angular/build @angular/compiler-cli

# Tailwind CSS(オプション)
pnpm add -D tailwindcss @tailwindcss/vite
3. Viteのバージョン固定
@analogjs/vite-plugin-angularがVite 7.xを要求するため、package.jsonでバージョンを固定する:
{
  "pnpm": {
    "overrides": {
      "vite": "^7.3.0"
    }
  }
}これを追加したらpnpm installを実行してバージョンを適用する。
4. WXTの設定
wxt.config.tsでViteプラグインを設定する:
import { defineConfig } from 'wxt';
import angular from '@analogjs/vite-plugin-angular';
import tailwindcss from '@tailwindcss/vite';

export default defineConfig({
  vite: () => ({
    resolve: {
      mainFields: ['module'], // ESMを優先
    },
    plugins: [
      angular({
        tsconfig: '[tsconfig.app](http://tsconfig.app/).json',
        // 特定のエントリポイントだけAngularを適用
        transformFilter: (_code: string, id: string) => {
          return id.includes('/entrypoints/popup/');
        },
      }),
      tailwindcss(),
    ],
  }),
});重要なのはtransformFilterの設定だ。これによってentrypoints/popup/ディレクトリ内のファイルだけがAngularコンパイラの対象になる。バックグラウンドスクリプトやコンテンツスクリプトは通常のTypeScriptとして扱われるため、Angularを使わないコードとの共存が可能になる。
5. TypeScriptの設定
プロジェクト全体の設定とAngular専用の設定を分ける。
tsconfig.json(プロジェクト全体):
{
  "extends": "./.wxt/tsconfig.json",
  "compilerOptions": {
    "experimentalDecorators": true,
    "useDefineForClassFields": false
  },
  "angularCompilerOptions": {
    "strictInjectionParameters": true,
    "strictInputAccessModifiers": true,
    "strictTemplates": true
  }
}tsconfig.app.json(Angular専用):
{
  "compilerOptions": {
    "target": "ES2022",
    "module": "ES2022",
    "moduleResolution": "bundler",
    "lib": ["ES2022", "DOM"],
    "strict": true,
    "experimentalDecorators": true,
    "useDefineForClassFields": false,
    "skipLibCheck": true,
    "isolatedModules": true
  },
  "angularCompilerOptions": {
    "strictInjectionParameters": true,
    "strictInputAccessModifiers": true,
    "strictTemplates": true
  },
  "include": ["entrypoints/popup/**/*.ts"]
}includeでAngularコンパイラが処理するファイルを限定している。オプションページなど他のエントリポイントでもAngularを使いたい場合は、ここに追加する。
6. Angularポップアップの作成
最後にAngularアプリケーションの入り口を作成する。
entrypoints/popup/index.html:
<!doctype html>
<html lang="en">
  <head>
    <meta charset="UTF-8" />
    <meta name="viewport" content="width=device-width, initial-scale=1.0" />
    <title>My Extension</title>
    <meta name="manifest.type" content="browser_action" />
  </head>
  <body>
    <app-root></app-root>
    <script type="module" src="./main.ts"></script>
  </body>
</html>entrypoints/popup/main.ts:
import './style.css';
import { bootstrapApplication } from '@angular/platform-browser';
import { provideZonelessChangeDetection } from '@angular/core';
import { App } from './app';

bootstrapApplication(App, {
  providers: [provideZonelessChangeDetection()],
}).catch((err: unknown) => console.error(err));entrypoints/popup/app.ts:
import { ChangeDetectionStrategy, Component } from '@angular/core';

@Component({
  selector: 'app-root',
  changeDetection: ChangeDetectionStrategy.OnPush,
  host: { class: 'block p-4' },
  template: `
    <h1 class="text-lg font-bold">Hello from Angular!</h1>
  `,
})
export class App {}entrypoints/popup/style.css:
@import 'tailwindcss';せっかくAngular v21になったので、provideZonelessChangeDetection()を使うことで、Zone.jsを使わない変更検知を有効にしている。ブラウザ拡張のような限定的な環境ではZone.jsのオーバーヘッドが無駄になることが多いため、バンドルサイズを抑え、ランタイムオーバーヘッドも最小化する。
開発とビルド
セットアップが完了したら、開発サーバーを起動できる:
# Chrome向け開発サーバー
pnpm dev

# Firefox向け開発サーバー
pnpm dev:firefox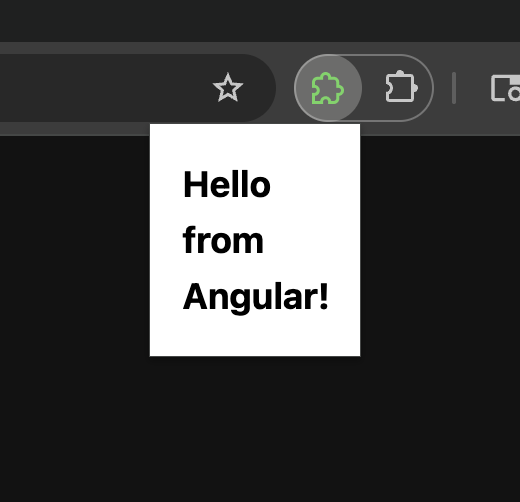
本番用のビルドとパッケージング:
# Chrome向けビルド
pnpm build

# Firefox向けビルドとZIP化
pnpm zip:firefox
まとめ
WXTとAngularの組み合わせで、モダンなブラウザ拡張開発ができる。WXTの開発体験の良さと、Angularの強力な機能を両立できるのが魅力だ。このスターターテンプレートを使えば、セットアップの手間なくすぐに開発を始められる。
冒頭のレポジトリはGitHubのtemplate repositoryとして公開しているため、興味があったらレポジトリ上の Use this template から自分でブラウザ拡張を作ってみてほしい。